![]() RusPO Relay
user manual
RusPO Relay
user manual
We are pleased to offer you RusPO Relay - our new and special software. With its creation, we have applied our own engineering and technology in the fields of recording and audio (speech), processing reliable transmission of compressed voice and of control signals via LAN or Internet (VoIP), as well as pairing with specific devices. In addition, for the first time in our batch commercial product we used Localizator - simple and convenient tool for a correct translation of the user interface into any language or dialect by the user, system administrator or regional distributor.
Before using the program you should be familiar with these instructions. It is fairly short, so please read it consistently and completely. It will avoid you of many problems in setting up and using the program. All topics are closely linked and familiarity with one arbitrary point instructions can give more new questions.
TABLE OF CONTENTS:
You do not always have the opportunity to place managers (operators) where the radio will work best. Office may be located on the lower floors of buildings, if any, in the area failed to locate radios and antennas, or in the zone of strong interference. Hams also can not always stay close to their transceivers at the right time. However, there is a solution! You can place the people where they feel more comfortable, and the radio - where it will work as it should. And then you can connect them via a computer network, using RusPO Relay - flexible, versatile and reliable solution for radio professionals and hobbyists.
The program allows
you through the Internet, virtual or local area network:

to control a remote transceiver
(walkie-talkie),
to listen to the broadcast and
to transmit;

to connect two transceivers in different
places through a network so that they work as a repeater. Thus, the two
groups of users in different locations may be coordinated.
Less common areas of
application of this software:

management and voice communication with the transceiver that is
connected directly to the operator's computer
(for convenience);

private
conventional voice communication over a network in a mode of "point
to point";

listen to remote areas, rooms;

to control devices such as intercoms, etc.
The program has low requirements to computer resources and networks , it even was tested on GPRS and dial-up modem connection. The program has a subsystem monitor the quality of connections and restores the connection after the breakage. However, if the connection quality, speed and duration of the delay in the line lead to frequent connection failure, you may experience unexpected problems.
We used the original method of audio compression, so the consumption of internet traffic is reduced to the minimum necessary. Nevertheless, it is desirable to use unlimited data plan to intensive use of the program,.We hope that our simple interface rather complex within the program and a large number of settings will allow users to apply the program in different ways and with radios (audio products) of different types and brands.
For the program needs a PC (x86) compatible computer with Windows and the audio subsystem. (Software was tested with Win XP SP2 with the standard audio driver and codec. Running to Win 7 may require the compatibility mode for use all the features of the program).
Recommended:
Processor: Celeron 2.4 GHz or better
RAM: 256 MB or above
Free space on your startup disk: 10 MB
You need a network adapter with full MAC address
To prevent the effects of acoustic feedback and echo cancellation, use
headphones (headset).
To complete the work on the network you need at least two copies of the program (on two computers). The radio can be connected to a "server role" computer or to the computer, playing the role of the client.
3. CONNECTING RADIO TO COMPUTER
We have provided a selection of options for connecting the radio to the computer, for convenience and versatility. At a minimum, the radio can be connected only to the mic (Line in) and Speaker (Line out) audio subsystem terminals and use voice activation (VOX") for switching modes reception and transmission .Also, for the management of the radio transmission signal (TX) can be used the "Scroll Lock" led on the keyboard of the computer and LPT port. Connecting to port LPT allows, in addition to controlling the transfer, manage three other radio buttons.
For reception of a signal RX from radio you can use voice activation (VOX"), LPT port, and if necessary, submit to the radio signal Rx on the right mouse button key or on the F11 keyboard key.
Connection should be handled by a qualified electronics engineer. Incorrect connection may cause damage to your computer or radio!
The majority of radios has not a built-in interfaces for the connection to the computer. In the general case, the signal from the radio line out (or speaker) need to submit to the line input or microphone input on the sound card of your computer. Signal line output from the computer sound card must be connected to microphone input of walkie- talkie. Signal levels should be set and agreed upon so that distortions have been minimal.
To control the transfer (PTT) you can use the voice
activation (VOX) - in this case, when the signal on microphone input
portable radio automatically turns on the transfer. In case, if the radio
does not have this built- in function, you can use simple circuit key (for
example, a simple circuit of ham Nicholas, RZ4HX - see figure).

Also, for the management of the radio transmission signal (TX) can be used the "Scroll Lock" led on the keyboard of the computer and the port LPT (pin N 2).
To determine that the dynamics of the radio speak sound, which must be transmitted over the network, the program has a built- in key VOX. For reception of a signal RX from radio you can also apply a LPT port (when the signal RX connect through a key input port pin 11 to the ground), and if necessary, use a similarly the right mouse button , or key F11 on the keyboard.
Connecting to port LPT allows, in addition to controlling the transfer, manage three other radio buttons (port pins N 3,4,5).
Note that when you restart the OS, inclusion and deenergizing of the computer, the findings of the LPT port can appear and disappear arbitrary duration signals! If at this time the port is connected to the radio buttons, responsible for the configuration, the configuration can be knocked down!
Operator control on
simplex or duplex radio through the network is not usually a problem.
The use of two of simplex radios, united in repeater through the
network, perhaps, will require better coordination of input and output
circuits with the computer. Stability of work of simplex radios depends
on their characteristics. In most cases, by adjusting the settings or
use simple circuit solutions (for example, to set the priority), it is
possible to achieve normal operation. Nevertheless, it is necessary to
consider features of a simplex (one- way) mode.
4. PROGRAM INSTALLING AND REMOVING
The program is usually delivered in packed form (in the archive). You should unpack the archive into the directory, available for recording. Then run the installation program (RRinstall.exe), select one of the available languages dialogue and follow the prompts. If everything is ok, the program is installed on the computer and placed shortcuts on the desktop or in the programs menu.
Archive program it is recommended to keep in a safe place.
The installation program in the process of operation keeps a log and save it to your desktop (RRinstall.log). After a normal installation you can delete log. If any errors have occurred, the log will help the computer administrator to understand the causes problems.
To remove the program from your computer use the same program that for installation (RRinstall.exe). If the computer has files of the program, it will detect them and offer to uninstall.
5. REGISTRATION
For the free demo version registration is not required.
If you have purchased the full version, it needs to register.
The registration procedure will need to make on the computer on which you want to use the program. Before the beginning of registration, adapters (network cards, modems, etc.) must be connected and in work, otherwise the program may be incorrectly configured. After the registration, computer configuration should not change , in order to avoid mistakes.
The unregistered program will not work and on first run will give the registration window. In the registration form used is the language that was selected at the installation of the program.
It is necessary to accurately and carefully fill in all fields of the form in accordance with the data stated at acquisition. After pressing the <NEXT>, the request file (*.rrf) will be formed on desktop and the program aborts. Request file (*.rrf) should be sent by e- mail or any other way in the address of the distributor. In response to the letter you will receive the key file (rr1.key). You need to place it on the desktop or directly in the program directory. If all actions are performed correctly, the next time you start the program will start to operate in normal mode. It is recommended to save a copy of the file-key in a safe place.
After successful registration, in the general case, the order of work with the program is the following:
1. Select the connection method the radio (if required)
2. Make the necessary settings for both the connecting computers.
3. To connect (menu "NETWORK / Connect").
4. To test the work.
Important Note. When you first start, the program
installs its driver into the system folder and opens a socket for
communication. If you have a firewall installed and (or) some anti-virus
software, they can warn you of such actions. You should allow the program
to perform all these actions, like the first time and subsequently.
Otherwise, the program can not work properly.
/"EXIT"
//QUIT- Selecting this item the program terminates.
/ "Network " submenu:
// Connect - In the "Server " mode - opens the program for the connection of remote PC. In the "Client" mode - initiates a connection to a remote PC (or to itself), using the current settings.
// Disconnect - Terminates the connection
// Reset connections - Terminates the connection, then tries to resume.
// Program reset - Terminates the connection, and then restarts the audio subsystem.
//
System log - Opens the panel of the system log, which shows the
current state of the subsystem and latest lines in the log files on
disk. On the disk log files are stored in a subfolder "LOG "in the
working folder of the application. Each running program initiates the
creation of a new pair of log files (for the client and server parts).
Log files older than 30 days are deleted automatically. The logs can be
used to determine the reasons for errors or instability.
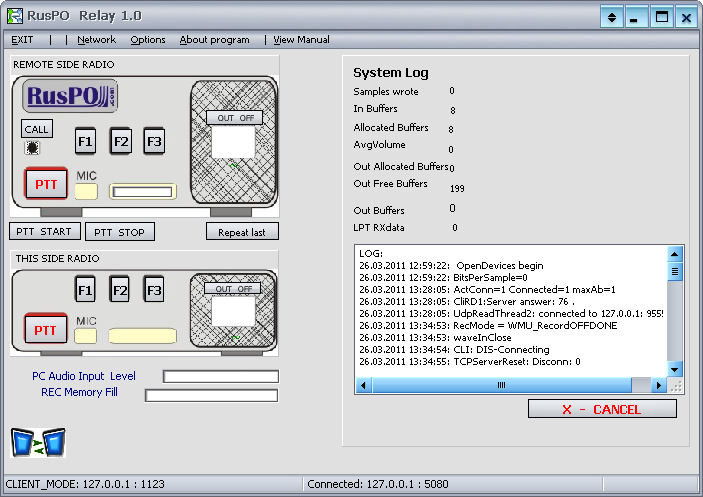
Is not recommended to keep the System log panel constantly open, because it creates the increased load on the system.
The program contains many settings for connection , sound and other, allowing to use it in different variants and conditions. To install settings your may ask system administrator or another computer specialist. After configuring and setting up the link, the work with the program is easy. The values set by default, in parentheses. The permissible limits are given in the square parentheses.
The default setting is made in such a way that, having chosen in the menu "Connection", you can immediately join in as a client to himself and check the options for sound and control. To prevent the effects of acoustic feedback and echo, it is recommended to use a headphone (headset).
Settings are saved and come into force only after pressing the button "Save and Apply". This also occurs restart of the program. If you clicked the "Cancel" button, the changes are not saved.
Options / connection
The program may connect by means of local computer networks or the internet with other instances of the program (for full- fledged work - not more than one at a time).
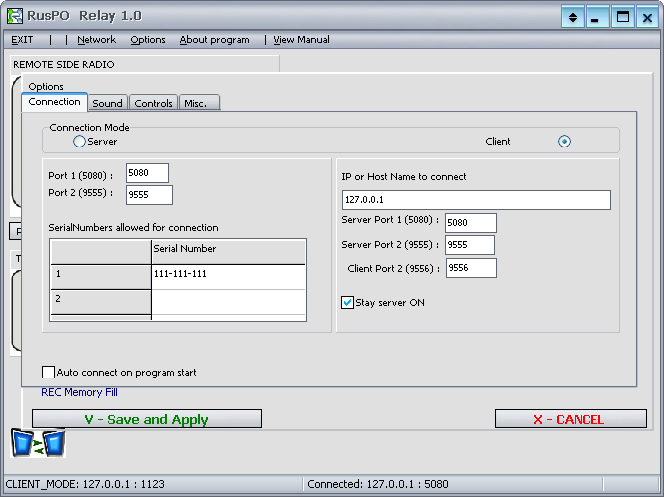
First you need to select the connection mode "server "or
"client".
In the "Server" mode program expects to connect to it another
instance of the program. For this purpose in settings are the port numbers
and a list of serial numbers of the programs, which is allowed to connect.
You can enter up to three serial numbers (including one local, which by
default is recorded in the first row), but the connection is possible only
with one client at a time. If the second client tries to connect, the
server disables both.
The port numbers should only be changed if the computer is already running other network program, which uses the same port numbers.
For work in a local network, it is enough to know the IP address or name in the local computer network, which is used as a server. For work in the internet, the IP address (IP v4) must be genuine ("white"), otherwise you 'll have to use any service like no-ip or dyn-dns.
In the "Client" mode program initiates the connection to the waiting programme ("Server"). For this in the column "IP or host name to connect" you must to specify the IP address (e.g., 192.0.0.1) or domain name (for example, server.loc). These port numbers 1 and 2 must match those on the server. The number of "Client Port 2" can be arbitrary.
If you put a check mark in the field "Stay server ON",
the program will at the same time and the client and server. This may be
necessary, for example, when testing. If you specify in the column "IP or
host name to connect" the 127.0.0.1 address, the program will
connect to itself. In
this case, make sure that your
serial number
is registered on the list.
A more complex version of this function is when a client is connected to
the remote server and at the same time as the server accepts the
connection from another remote client (see fig. )

However, in this case the normal voice two- way communication will be
possible only with the server. Connecting the remote client will be
available only for listening. To find out your IP network address, you can
take advantage of the opportunities of the operating system or use a free
utility "RusPO MyIP".
"Auto-connect on program start ". Ticking this box will ensure that the client will automatically try to establish a connection at startup, the program is restarted and after changing the settings. It is recommended to enable this option only if you have proven communication.
It happens that the connection is suddenly interrupted (for example, because of problems in the line). The program incorporated mechanisms for determining the break. If this happens, the program tries to restore the connection a large number of times through increasing time intervals.
Options / Sounds
Settings are separated for input devices (microphone or line inputs) and output (line out) audioboard of your computer. The input and output can be carried out through the various devices. This is convenient because the quality of these devices can be used, in addition to built- in sound system, for example, a bluetooth headset.
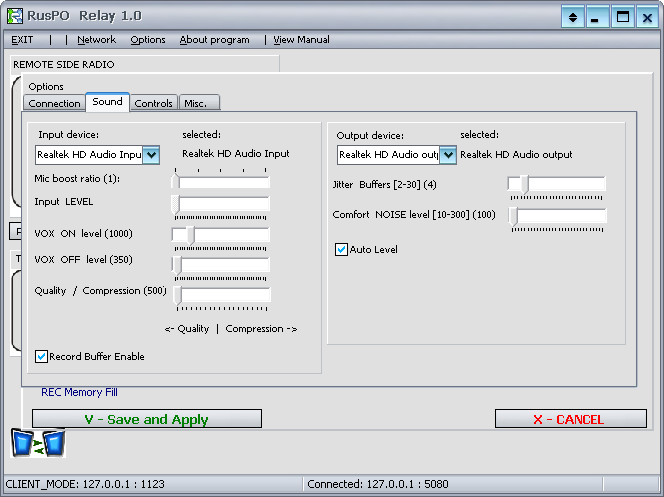
First, select the devices you want. After it, is recommended that you save the settings, so that they worked, and once again return to them. By means of the operating system should be selected for the selected device a specific channel input (line in or microphone) and adjust its gain. It is also recommended to enable the echo cancellation, if this mode is provided by the driver. It should be noted that many of voip programs intervene in the settings, so, in order to prevent conflicts these programs should be closed.
The "Input level" should dynamically display the average level. This is done for the convenience of other settings. Don't touch it .
The "Mic Boost" you can leave equal to 1, or a bit of a boost if the microphone is quiet and in the driver is already setted the maximum gain . A large increase may lead to the distortion of the sound.
Setting "VOX ON level" (activation key) must be higher than the "Input level" in the pause and is lower than the "Input level" in the presence of the signal at the input.
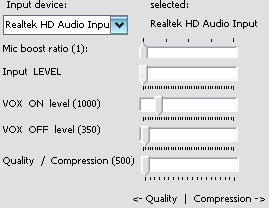
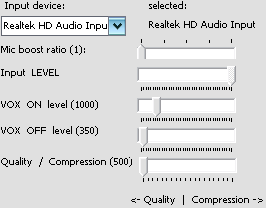
(You can see on the figures as changing the signal level in the silence
and at some signal to the microphone input. Settings of VOX are
correct.)
Setting "VOX OFF level" (off key) should be a bit higher than the "Input level" in the pause and is lower than the "VOX ON level".
The ratio "Quality / Compression" is selected on the basis of the need to save bandwidth and signal level. Specified by experience.
The number of "Jitter buffers" to eliminate jitter audio is to selected on the basis of the delays in the network. In the local network enough 3-4, as well as at a good Internet connection. In wireless networks, such as GPRS/EDGE may need to increase the buffer. At the same time with the growth of their number grows and delay. At 30 buffers, for example, the delay will be about 1.5 seconds.
"Comfort Noise level" sets the level of comfort noise. If the program manages the radio, can be reduced. If the program works with the operator, level can be a bit of a boost.
"Auto level" is averages level of sound reproduced.
"Record Buffer Enable" activates the recording from the microphone in the buffer. If the phrase transmitted successfully to the network, the buffer is cleared. If the connection is interrupted, the program writes sound in the buffer (while there is a place) to send them later, when the connection will be restored. Should be taken into account that a large volume of transmitted information in the restoration of communication seriously will load the network and computers and can even serve as the cause of failure. When this information may already losing relevance.
Options / Controls
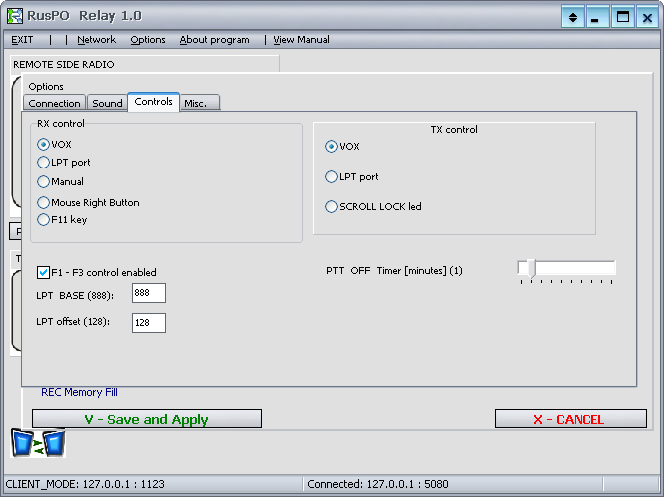
In The Group "RX control" you can choose the method of getting
from a radio (or from the operator) a signal about the audio. Signal RX,
respectively, launches sound transmission through the network to the
remote computer. There are different options, such as for use by the
operator, and for connection to the radio:
1) VOX - triggered at a certain level of volume of the audio
input (microphone or line input), setted in "Options / Sound" (manual
control is remains active)
2) LPT port - works with the closing line 11 port to the ground
through a small amount of resistance.
(See note below)
3) Manual - only on- screen buttons <PTT>, <PTT
START>, <PTT STOP> works.
<KEY> press and hold the left mouse button. While the button is
pressed, is broadcast on the network.
<PTT START> you should press with the left button of the mouse and
release ("click"), does not hold. This initiates constant broadcast in
the network. It lasts up to operation of the timer, limiting the
transmission time ("PTT Off timer") - a maximum of 10 minutes, or until
you press <PTT STOP>.
<PTT STOP> - ceases to broadcast in the network, started by <
PTT START>.
4) Mouse Right Button - translation is activated if you press
and hold the right mouse button over any place of the program window,
excluding the title. It is convenient for operators: you can move the
window off the screen, leaving a small corner, and click on it. This
program takes a minimum of space on your desktop. You should check the
functionality of the possible conflicts with other programs, that also
use the right mouse button.
5) F11 Key - translation is activated if you press and hold the
key F11 on the keyboard and stops when you release the key. This is a
fairly simple option to connect the radio to the computer, on which
there is no available LPT port. You should check the functionality of
the possible conflicts with programs that also use the F11 key.
In The Group " TX options"
you can select the way of start of a radio transmission. There are
various options for connecting the radio (see also chapter "CONNECTING
RADIO TO COMPUTER"):
1) VOX - should be selected, if this computer is used by the
operator. Or pc is connected to a portable radio with an appropriate
function.
2) LPT port - radio will be managed by the port.
(See note below)
3) SCROLL LOCK led - the signal to activate a radio
transmission can be taken from SCROLL LOCK led on the keyboard. You
should check the functionality of the possible conflicts with programs
that use the SCROLL LOCK.
F1-F3 function - tick should be set, if the transmitter is
connected to the LPT port and require control of some buttons. In the
interface of the program these radio keys conventionally referred to as
F1, F2, F3.
LPT base - specified decimal address of the parallel port
(default 888)
LPT offset - constant for the implementation of the input from
radio signal RX. With the closing port line 11 to the ground through a
small amount of resistance, the port status is changed. If it becomes
more constants (the default value is 128), it is perceived as a signal
RX. You can check the port status be at the selected options LPT port in
the group "RX control". The string "LPT RXdata" in the system log shows
the actual status of the port.
Note. The
functions of the parallel port (LPT) can not work in operating systems
W. Vista and W.7. In addition, even with W. XP, may require additional
port settings in the BIOS and in the OS, especially if these settings
are different from those installed on your system by default. Default
settings in RusPO Relay meets the following characteristics of the port:
BIOS:
Mode = ECP + EPP
Parallel Port = 378 / IRQ7
DMA = 3
Device Manager - Ports - Printer Port:
Use any interrupt = selected
Allow discovery of an old Plug & Play = disabled
The Input/Output range = since
0378 (equivalent to decimal 888)
PTT Off timer - specifies the maximum time of work on transmit
within 1-10 minutes.
Options / Misc.
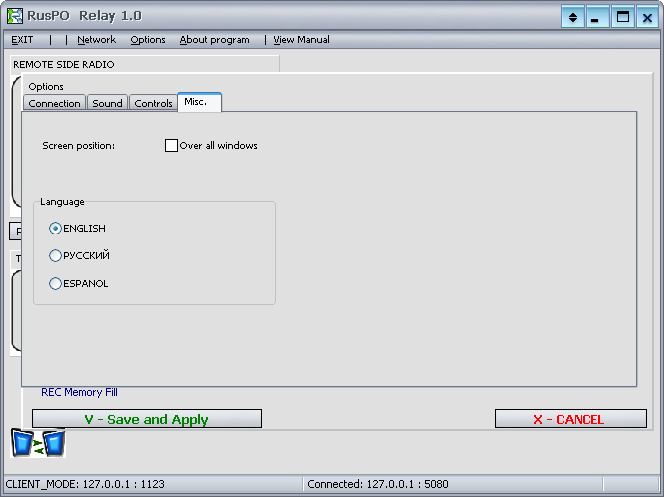
If you select "Screen Positionis - over all windows", the program
window will try to take the top position.
Selection the language from the available allows to localize the
interface of the program. However, according to the tradition, system
log, logs and some of the error messages are always displayed in
english.
Usually the program comes with three languages localization. However,
our localization technology "Localizator" allows the distributor
or even end users to easily translate the program interface into any
language, or even into the local dialect, using the russian or english
language as a basis for the translation.
Options / Remote PC
The option is available since
version
1.10.
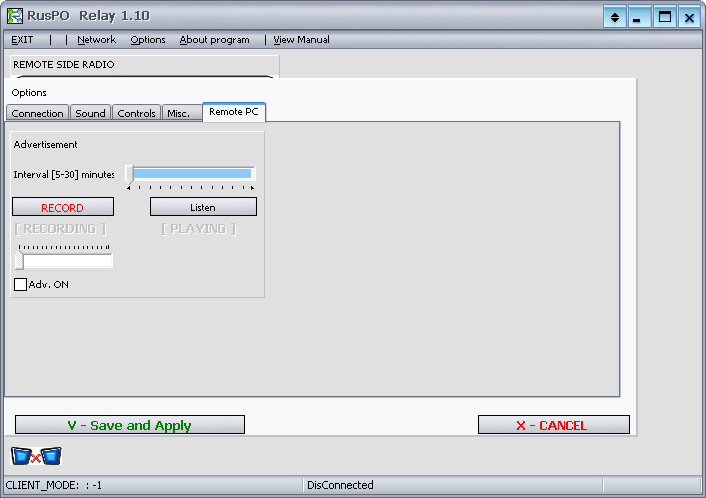
From version 1.10 there
is opportunity to play the periodic promotional information or sound
clips in the software. This can be used, such as speakerphone audio
devices to play media. And also for the transceivers to be used as
beacon, or to periodically broadcast the broadcast call signs (if
permitted by local law).
In this window you can change the settings, play and record sound
file.
These settings affect the remote computer and transmitted to it after
the connection. However, you can prepare the file (s) and set the
options on the same computer, where ads will be played without using a
second instance of the program RusPO Relay. To do this in the settings
of "Connect" option, choose "Client" and "Leave the server enabled"
and in column "IP or host name ..." specify the address of 127.0.0.1
or localhost (as shown on the screenshot for the connection settings
). In this case, the program connects to itself and you can tune.
Clips are played with time intervals defined by the slider "Interval."
However, the actual frequency depends on the length of the roller and
the load of ether (the channel). File is played only if the air
quietly for at least 10 seconds. This avoids interference with
communication.
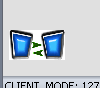
Clips are played, if you selected "Adv. ON" On the main window status
of this option for local and remote computers can be seen with the
indicator "Ads ON".
![]()
If this option is off,
this indicator does not
appear
at all.
If enabled, the indicator is
a pale gray.
If this option is enabled,
and ad is
currently playing, the light is
red.
![]()
At this time, the sound is off from the microphone input to the
network. Main menu options are also disabled.
Sound file recording is easy. At the time of entry you have to disable
the option "Ads ON" and break the connection. The announcer must tune
the position of the microphone and volume, focusing on the slide
indicator. Then, press and hold the button "RECORD" by mouse. After
reading the text, release "RECORD". Listen to the resulting file by
clicking the button "LISTEN". Similarly, you can write the file, not
only from a microphone, but also from other audio devices via line-in
sound card, using a separate cable.
The file is written in the program folder and is named adv.ad. When
you link to the peer, if AdvSending temporary option is
enabled, the file is transmitted to a remote computer and stored in
the program folder under the name adv.adv. If "Adv. ON" is enabled on
both computers, files sharing while the connection. The file is
written in a special compact format optimized for transmission across
networks. However, do not burn the clip of more than 1 minute. A file
with a length of more than 100 KB will not be shared over a network.
There is also an opportunity to play two or three different audio
clips. To do this, rename recorded file adv.ad into adv.adv2 and
adv.adv3 respectively by standard OS tools. Then these files must be
placed in the program folder. They will play in rotation. However,
additional files are not transferred over the network to the remote
location.
Submenu "About program"
Displays information about the current version of the program, about the serial number and provides a link to the website of the author.
Submenu "View manual"
Opens the manual of the program in a browser installed by default.
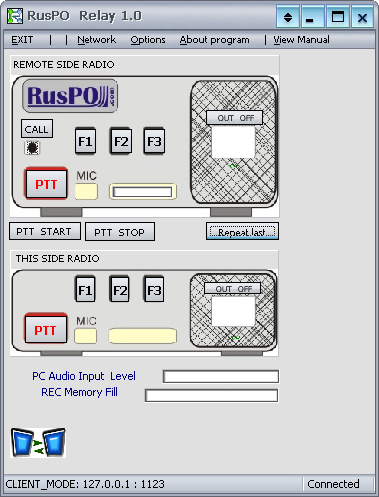
Panel "REMOTE SIDE RADIO"
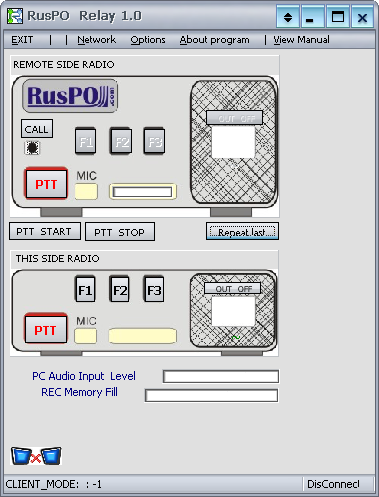
Symbolically shows the status of the remote computer (the
real portable radio may not be connected to it ), if the connection to it
is established.
The "MIC / TX" shows, that from the network receives the signal,
which is transmitted to the output audio subsystem (PC SPEAKER or LINE
OUT), where, when connecting a radio, radio microphone input connected.
The indicator strip on the right shows the signal level.
The "RX" appears in the white box in the middle of the drawn
"dynamic " of the radio, when the input audio subsystem (MIC or LINE IN)
gets the sound signal to be broadcast in the network.
The "~" under the white field shows that the broadcast audio is
enabled.
<OUT OFF> Button above the white field disables sound
transmission to the network of the remote computer.
The "X" under the white field shows that the broadcast audio is
disabled.
<CALL> Button causes theOS sound, which is broadcast to the
output audio subsystem of the remote pc (for example, to attract
attention). Confirming the sound is heard on the local PC.
< PTT> Button launches sound transmission in the network
from the local computer to the remote, even if the signal at the input
audio system is missing or silent. In addition, TX mode turns on on the
remote computer . Press and hold <PTT> by left mouse button. While
the button is pressed, is broadcast on the network.
<PTT START> you should press with the left button of the
mouse and release ("click"), does not hold. This starts constant broadcast
in the network. It lasts up to operation of the timer, limiting the
transmission time (<PTT Off timer>) - a maximum of 10 minutes or
until you press <PTT STOP>.
<PTT STOP> - ceases to broadcast in the network, started by
< PTT START>.
< Repeat Last> button is used for playback of the last
received fragment of speech in case, if you, for example, didn 't catch it
as well. During the playback, reception of new signals from the remote
computer is blocked. Button is not valid if at the moment of clicking on
it already goes signal reception.
<F1-F3> - should be pressed, if the transmitter is connected
to the LPT port and require control of some buttons. The corresponding
options must be enabled in the settings. If the signal really reached the
remote pc, the icon "=" appears on the appropriate button.
Panel "THIS SIDE RADIO"
Symbolically shows the status
of the local computer (the real radio may not be connected to it).
< PTT> Button forced the "TX" mode on the local computer
(for example, checking the connection of the radio). Press and hold it
by the left mouse button.
<F1-F3> - should be pressed, if the transmitter is
connected to the LPT port of your computer and you want to manage some
radio buttons. The corresponding options must be enabled in the
settings. If the control signal is made, the icon "=" appears under the
appropriate button.
The "RX" appears in the white box in the middle of the drawn
"loudspeaker "of the radio, when the input audio subsystem PC (MIC or
LINE IN) gets the sound signal to be broadcast in the network.
The "~" under the white field shows that the broadcast audio is
enabled.
<OUT OFF> Button above the white field disables sound
transmission in the network of the local computer (similar to "mute"
button on the home phone).
The "X" under the white field shows that the broadcast audio is
disabled.
The "PC Audio input level "
Shows the level of signal at the input of PC audio subsystem (MIC or
LINE IN).
The "REC Memory Fill "
Shows the level of filling of record memory buffer of the local pc, if
this option is enabled in the settings. If the connection is
interrupted, the program writes sound into the buffer (while there is a
place) to send them later, when the connection will be restored. Should
be taken into account that a large volume of transmitted information in
the restoration of communication seriously will load the network and
computers.Herewith this information may already lost relevance.

The image in the lower part of the window symbolically reflect
the connection status.
The status bar at the bottom of the window shows the status of
the connection, the IP address and port for local and remote computers.
If the remote computer does not have the "white" IP addresses, status
bar line contains data of network router.10.
DEMO-version is designed to familiarize you with the basic
functionality and with the interface of the program.
DEMO-version is free of charge and requires no registration.
DEMO-version works, basically, as well as fully featured, but it has the
following limitations:
- The period of use is limited to 21 days;
- Every 4 hours of work communication
is interrupted (you can re-connect manually via the menu);
- Every 4 hours ads broadcast
mode
is
deactivated
(you can restore it manually through the settings menu);
- The names of some files have differences;
- Some options are not available in
the program (for example, you can not edit a table of valid serial numbers for the connection.
Please note that the demo version is usually updated later than the paid versions of the program, and may not contain features that are present in the paid versions.
We strive to release our programs against errors in the extent to which
this is possible.
However, there is a general rule that there are no programs, completely
free of errors. The number of errors increases with the complexity of the
programme and its degree of relationship with other software products.
Therefore, we cannot guarantee, that all features of the program will be
operational without any errors in any environment, on any computer, along
with any other installed software, including the operating system and
built- in hardware or supplied together with the hardware software.
We ask users to send us a message about the obvious errors in the program,
as well as concrete suggestions on improving the program. These messages
will be gratefully us be accepted. Thus, together, we can make the program
even better, more comfortable and reliable.